Nateo Tutorial: Time Chart Events
In this tutorial we will handle some specific events from the Nateo controls. This will show you how to react on the user's activities in order to precicely control your application's behaviour.
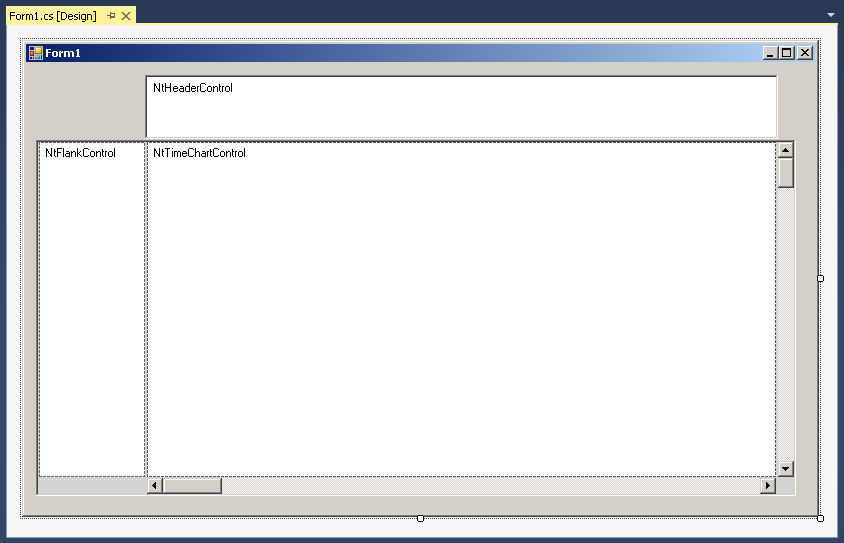
To start, please create an application with one Flank Control in a way that it looks like this in the designer:
1. Preparing the application
First add the file 'MyNtApplication.cs' to your project. The class in there will act as NtApplication interface.
Then add the following members to your Form class:
List<NtDisplayDef> displayDefs;
List<NtDataObject> dataObjects;
NtPerspective perspective;
MyNtApplication myNtApplication = new MyNtApplication();
Next add the file 'TutorialData.cs' to your project. The class TutorialData will help us to load data and Display Definitions from the demo files provided in this package.
Then let your Form1_Load() method look like this:
private void Form1_Load(object sender, EventArgs e)
{
ntTimeChartControl.SetNtApplication(myNtApplication);
ntTimeChartControl.Init(10 * 24, 90, TimeDisplayMode.hours);
ntTimeChartControl.SetScrollBars(ntTimeChartControlHScrollBar, ntTimeChartControlVScrollBar);
ntHeaderControl.Init(ntTimeChartControl, Font, Font, false);
ntLeftFlankControl.Init(ntTimeChartControl, null, ntLeftFlankControl.ClientSize.Width);
ntBackPanel.SetPadding(2, 2, 2, 2);
ntBackPanel.Repos(ntLeftFlankControl, ntTimeChartControl, ntTimeChartControlHScrollBar, ntTimeChartControlVScrollBar);
ntTimeChartControl.ScrollToDt(DateTime.Now, ntTimeChartControl.ClientSize.Width / 2, 0);
ntTimeChartControl.Focus();
//Load SampleData
Graphics g = CreateGraphics();
string workingDirectory = "..\\..\\..\\..\\..\\DemoData\\"; //adapt this accordingly to the path where the 'data' directory is located
myNtApplication.bitmapDirectory = workingDirectory + "images\\";
TutorialData.LoadIconsFromDir(myNtApplication.iconDict, workingDirectory + "icons\\", g);
if (myNtApplication.iconDict.Count == 0) MessageBox.Show("Error: No icons found!");
displayDefs = TutorialData.LoadDisplayDefsFromFile(workingDirectory + "displayDefs.txt");
perspective = TutorialData.LoadPerspectiveFromFile(workingDirectory + "perspective_05.txt");
dataObjects = TutorialData.LoadDataObjectsFromFile(workingDirectory + "dataObjects.txt");
//Put Display Definitions and Row Headers to Time Chart
for (int i = 0; i < displayDefs.Count; ++i)
{
NtDisplayDef dd = displayDefs[i];
ntTimeChartControl.SetDisplayDef(dd);
NtRowHeader rh = new NtRowHeader();
rh.InitRowHeaderText(dd.rowHeaderStr, Font, dd.textBrush, dd.bkBrush, g);
ntTimeChartControl.SetRowHeader(dd.dataTypeId, rh);
}
//Put the data to the Time Chart and set the current Perspective
ntTimeChartControl.SetNtPerspective(perspective);
ntTimeChartControl.SetData(dataObjects);
}
2. Adding Event Handlers
Now we will add certain event handlers and see how to use the event args.
Mouse clicke events
To your Form1_Load() method please add the following lines of code:
ntTimeChartControl.displayObjectDblClick += (s, eventArgs) => { NtDisplayObject ntdo = eventArgs.displayObject; ntTimeChartControl.DeleteDataObject(ntdo.DataObject.objId); ntTimeChartControl.Invalidate(); };
ntTimeChartControl.displayObjectRightClick += (s, eventArgs) => { NtDisplayObject ntdo = eventArgs.displayObject; MessageBox.Show("Right Click:\r\n" + ntdo.DataObject.text); };
This adds event handling for right clicks and double clicks on objects. In this example, a double click will delete the object, while a right click pops up a message box. In a professional application you will
probably initiate some action on the object and you will display a pop up menu.
Drag event
To your Form1_Load() method please add the following line of code:
ntTimeChartControl.endObjectDragging += (s, eventArgs) => { if(MessageBox.Show("Cancel Dragging?","Dragging",MessageBoxButtons.YesNo)== DialogResult.Yes) eventArgs.Cancel(); };
This handler is called when the dragging of an object is about to end. The handler asks if you want to cancel the dragging or not. If you do, the object flips back to its original position. This technique makes sense
if you want to allow users to do object dragging but you want to check if certain conditions are met or not. And if not, you might want to cancel the dragging and reverse the action.
Object selection event
To your Form1_Load() method please add the following lines of code:
ntTimeChartControl.displayObjectSelect += (s, eventArgs) => { NtDisplayObject ntdo = eventArgs.displayObject; if (ntdo.DataObject.text.Equals("b3.jpg")) eventArgs.Cancel(); };
This event handler cancels the object selection event if the object's text is 'b3.jpg'. As a consequence you can not select such an object any more.
Remarks
Of course there are more events than the ones covered in this section. The important message here is that event handlers are quite easy to implement. The event arguments contain all the information you need to
track back the source of the event. In case of the NtDisplayObjectEventArgs e.g. you will receive a reference to a NtDisplayObject which contains a reference to
the NtDataObject, the NtDisplayDef, the PaintRect and others.
Many events can be cancelled, so the action that evoked the event is prohibited or - if already partially executed - even reversed. This allows you to control user actions.
When catching events that are related to NtDisplayObjects (and thereby to your data objects), you can find out about the data object and thereby about the data type via the event argumetens.
Having done this, your application can react dependently on the type of object or the objec's data. E.g. you might allow the dragging of a certain type of data but not of others. Or you perform a specific action
or show a specific context menu in dependence of the selected object(s).
Back to Overview