Nateo Tutorial: Browsing the Time Axis


This is a pretty small tutorial, which describes how you add navigation capabilities to your application in order to let the Time Chart jump to certain points of time. And it shows how to switch the Time Display Mode between months, days, quarterdays, hours, quarters of hours and five minutes.
 
The functionality we will create in this tutorial is alredy built into the Time Chart: Right clicking on the Header Control will bring up a small popup that allows browsing in time and changing the Time Display Mode. Anyway we want to do all of this by our own program to show how the application easily can control the Time Chart.


1. Preparing the application
 
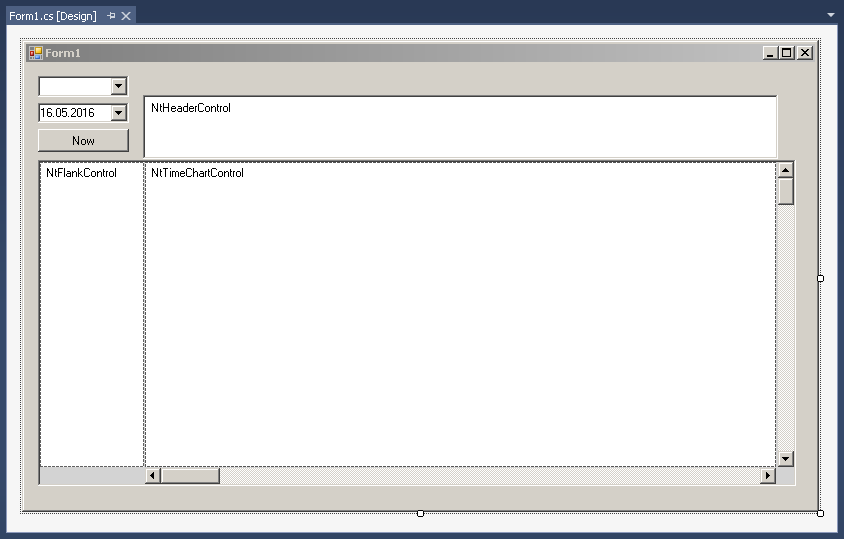
To start, please create a Form application and add the NtTimeChart, NtFlankControl, NtHeaderControl, NtBackPanel, and horizontal and vertical scrollbar to the From as done before. In addition, please now add the following items to your form to the top left:

In the designer of your IDE the form should now look like this:


Then add the file 'MyNtApplication.cs' to your project. The class in there will act as NtApplication interface implementation.
 
Then add the following members to your Form class:
 

List<NtDisplayDef> displayDefs;
List<NtDataObject> dataObjects;
NtPerspective perspective;
MyNtApplication myNtApplication = new MyNtApplication();

 
Next add the file 'TutorialData.cs' to your project. The class TutorialData will help us to load data and Display Definitions from the demo files provided in this package.
 
Then let your Form1_Load() method look like this:
 

private void Form1_Load(object sender, EventArgs e)
{
ntTimeChartControl.SetNtApplication(myNtApplication);
ntTimeChartControl.Init(10 * 24, 90, TimeDisplayMode.hours);
ntTimeChartControl.SetScrollBars(ntTimeChartControlHScrollBar, ntTimeChartControlVScrollBar);

ntHeaderControl.Init(ntTimeChartControl, Font, Font, false);
ntLeftFlankControl.Init(ntTimeChartControl, null, ntLeftFlankControl.ClientSize.Width);

ntBackPanel.SetPadding(2, 2, 2, 2);
ntBackPanel.Repos(ntLeftFlankControl, ntTimeChartControl, ntTimeChartControlHScrollBar, ntTimeChartControlVScrollBar);

ntTimeChartControl.ScrollToDt(DateTime.Now, ntTimeChartControl.ClientSize.Width / 2, 0);
ntTimeChartControl.Focus();

//Prepare the combo box
cbDisplayMode.Items.Add("5 Minutes");
cbDisplayMode.Items.Add("15 Minutes");
cbDisplayMode.Items.Add("Hours");
cbDisplayMode.Items.Add("6 Hours");
cbDisplayMode.Items.Add("Days");
cbDisplayMode.Items.Add("Months");
cbDisplayMode.SelectedIndex = 2;

//Load SampleData

Graphics g = CreateGraphics();
string workingDirectory = "..\\..\\..\\..\\..\\DemoData\\"; //adapt this accordingly to the path where the 'data' directory is located
myNtApplication.bitmapDirectory = workingDirectory + "images\\";

TutorialData.LoadIconsFromDir(myNtApplication.iconDict, workingDirectory + "icons\\", g);
if (myNtApplication.iconDict.Count == 0) MessageBox.Show("Error: No icons found!");
displayDefs = TutorialData.LoadDisplayDefsFromFile(workingDirectory + "displayDefs.txt");
perspective = TutorialData.LoadPerspectiveFromFile(workingDirectory + "perspective_12.txt");
dataObjects = TutorialData.LoadDataObjectsFromFile(workingDirectory + "dataObjects.txt");

//Put Display Definitions and Row Headers to Time Chart
for (int i = 0; i < displayDefs.Count; ++i)
{
NtDisplayDef dd = displayDefs[i];
ntTimeChartControl.SetDisplayDef(dd);
NtRowHeader rh = new NtRowHeader();
rh.InitRowHeaderText(dd.rowHeaderStr, Font, dd.textBrush, dd.bkBrush, g);
ntTimeChartControl.SetRowHeader(dd.dataTypeId, rh);
}

//Put the data to the Time Chart and set the current Perspective
ntTimeChartControl.SetNtPerspective(perspective);
ntTimeChartControl.SetData(dataObjects);
}


Please see that in this code we defined the options that will be available in the ComboBox.


2. Add Handlers for the Browsing Controls
 
A) Add a SelectedIndexChanged handler to your cbDisplayMode ComboBox and let it look like this:
 

private void cbDisplayMode_SelectedIndexChanged(object sender, EventArgs e)
{
Cursor = Cursors.WaitCursor;
ntTimeChartControl.SetTimeDisplayMode((TimeDisplayMode)cbDisplayMode.SelectedIndex, 90, ntTimeChartControl.ClientRectangle.Width / 2);
Cursor = Cursors.Default;
}

 
B) Add a CloseUp handler to the dtPicker and let it look like this:
 

private void dtPicker_CloseUp(object sender, EventArgs e)
{
DateTime dt = dtPicker.Value.Date.ToLocalTime().Date.AddHours(12);
ntTimeChartControl.ScrollToDt(dt, ntTimeChartControl.ClientSize.Width / 2);
}

 
C) Add a Click handler to the buttonNow and let it look like this:
 

private void buttonNow_Click(object sender, EventArgs e)
{
dtPicker.Value = DateTime.Now.Date;
ntTimeChartControl.ScrollToDt(DateTime.Now, ntTimeChartControl.ClientSize.Width / 2);
}


Discussion
 
As you can see you do not need too much code to control the time browsing. A few aspects are worth mentioning:


Back to Overview