
Basic Concepts of the Nateo Time Chart Control
Overview
This section describes the basic concepts of the Nateo Time Chart.
The Nateo Time Chart is a chart that aligns the time axis from year 0 to year 9999 (including) horizontally. Applications that use it can store data objects into it. Each data object has one time stamp
for beginning (or occurence) and one for end. The data objects are displayed in the chart at the position of their time stamp. The way how they are displayed can be controlled by the application in a simple
systematic way that enables a consistant display of huge amount of data. Millions of data objects can be stored and shown.
The time axis can be scaled so that one screen covers either several minutes, hours, days, moths or years.
In vertical direction data is organized in rows. Rows can be assigned to groups (so called categories) that users can open and close. Within groups it is even possible to create subgroups so that a
tree like arrangement is created.
The Nateo Time Chart works on global time stamps internally (based on
Technically the Nateo Time Chart is optimized for performance: Even with hundreds of items on the screen it reacts promtly, scrolls smoothly and is quick on adding, deleting or changing data.
The Nateo Time Chart is a typical Windows Forms control for easy use in a Windows .NET application. It fires events on specific user actions (like clicking or dragging of objects) to let
the application fully control the behaviour.
Users can interact with the control and the data in it: Scrolling, moving the chart with the mouse, select or multi-select objects, drag objects, change time scale, rearrange rows or even categories,
use cross hairs etc.
Tool tips for data objects can be created as simple text or as HTML pages. The latter one allows to generate huge colorful and nicely designed tooltips dynamically for each of the data objects on demand.
All the programmer needs to do is to implement an interface method that creates the HTML string for a given data object.
Getting started
To get started, please take a look on the following Windows Form that contains nothing but a very simple Time Chart:
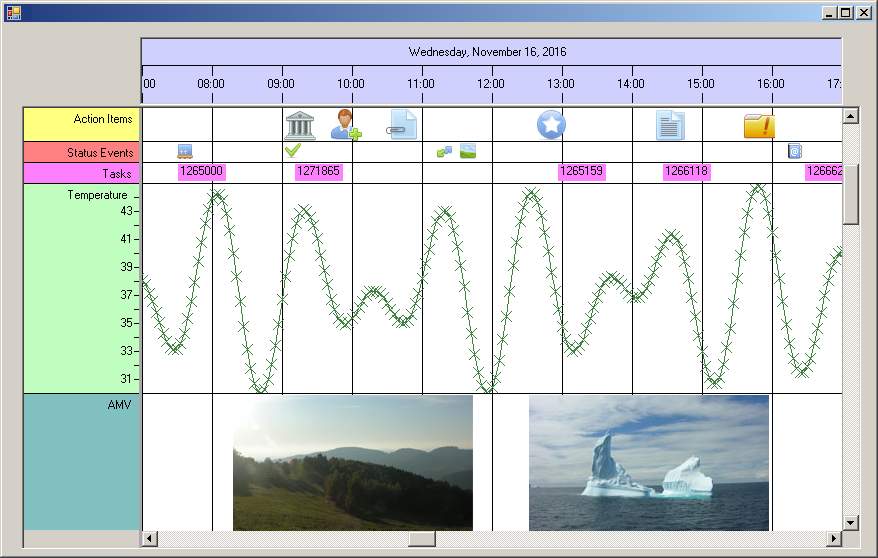
What you can see is the NtTimeChart control in the center showing the Data Objects, then on top the NtHeaderControl showing the time scale and date, and finally a
Flank Control on the left making up the legend. To the bottom and to the right there are horizontal and vertical scroll bars.
Obviously the data is being organized in rows. This means that all items that are of the same Data Type reside in the same row. The assignment of data types to rows determines which data is located in
which row and if certain data is visible at all or if it is hidden. As this defines the current arrangement of data on the screen it is called Perspective. Changing the Perspective means changing
the row arrangement and hiding / showing rows.
And it is obvious that different types of data are being
displayed by different techniques (curves, icons, bitmaps, texts). To achieve this there exists one Display Definition per Data Type that defines the so called Display Mode for the Data Type.
Summing this up:
- The NtTimeChart contains a set of data that consists of a huge number of Data Objects.
- Each Data Object is of a certain Data Type.
- All objects of one type are placed in the same row. So one data type can be assigned to only one row at a time.
- Still more than one data type can be assigned to the same row. In other words: One row can contain data of different types.
- Assignment of data types to rows is done by the Perspective
- For each Data Type there is a Display Definition stored in the Time Chart that defines the Display Mode for all objects of that type.
- The Time Chart by default knows the display modes 'Text', 'Curve', 'Icon' and 'Bitmap' which suits for many applications already.
- Additionally programmers can implement unlimited custom display modes to do the drawing of items individually.
Example:
Assume you want to display your data base content consisting of 20,000 temperature values and 15,000 pressure values. Then you set up a Time Chart and create 35,000 data objects: 20,000 with data type 1 (for temperature)
and 15,000 with data type 2 (for pressure). Next you create two Display Definition objects (one for temperature and one for pressure) that define how to draw your data: Display mode (maybe you want temperature as a curve while
pressure as icons), colors etc. Finally you set up a Perspective that defines if both data types are visible and if they each have a row of their own or if both are shown in only one single row.
<< Prev.: Concept Overview Next: The Data Sheet >>